Synth1: Introduction to subtractive synths.
If you are new to sound designing, subtractive synthesis is the way to start things of. Synth1 is one of the best freeware subtractive synths around with tons of patches released for it. It is also one other best sounding synths. One disadvantage, its user interface is not friendly. This post gives an introduction to its interface, explains some basic synth parameters which are common to all synths and gives you an idea of synth1 and subtractive synthesis in general. In future posts, i am going to do a few sound design tutorials (dubstep basically) using synth1.
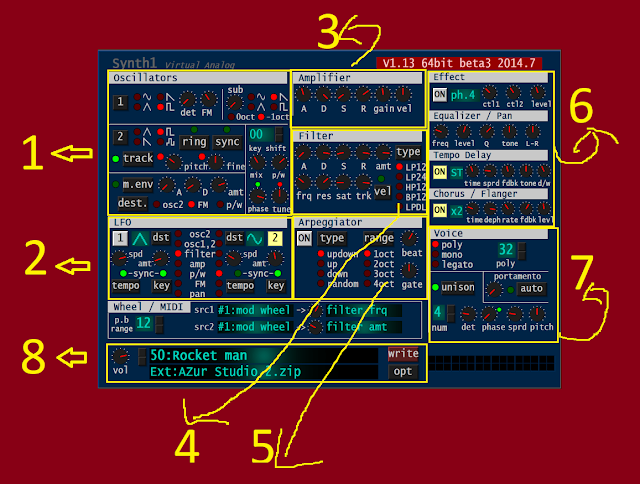 The above diagram shows all the sections available. Open the diagram in a new tab to use it as a reference when i explain the sections below.
Oscillator section is where our sound originates. The sound is shaped be many parameters which is gonna be covered in other sections aswell.
Osc 1: Osc 1 contains 4 basic waveforms - Sine wave, Saw wave, Triangle and a square wave/pulse. It also contains a detune knob to detune the sound aswell as a FM Knob which'll Frequency modulate the sound of osc1 from osc 2. FM is used in making metallic sounds which are helpful to make modern dubstep synth patches.
Osc 2: Osc 2 also contains 4 waveforms but instead of a sine waveform there is a noise oscillator. Ring button is used for ring modulation and sync is used to sync the frequency of both oscillators.Track button pitches the output according to the note number played. When turned off, sound is output at a uniform frequency. Pitch is used to adjust pitch of osc2 and Fine is used for minor changes in pitch.
Modulation Envelope:
An envelope is basically used to shape the sound. Modulation envelope shapes the modulation. A knob is used to set Attack, D knob is used to set Decay and amt is for amount to be applied. This envelope can be applied to any one of the three destinations that is FM, osc2 and pulse width.
Coming to the Oscillator mixer,
Key shows that current key at which the oscillator is playing. Shift buttons can be used to shift the key to any number of semitones.(-12 means 1 octave low and +12 means 1 octave high). Mix is used to mix the sound of oscillators. Left side of the knob is going to be osc1 and right is for osc 2. P/W is used to manipulate pulse width.Phase is used to adjust the phase and tune is used for minor adjustments in pitch
A stands for Attack and is used to shape the time taken for your sound to hit its peak.
D stands for Decay and is used to shape the time taken for your sound to reduce from the attack level to sustain level
S stands for Sustain and is used to shape the level during the time the key is held.
R stands for Release and is used to shape the time take for the level to reach zero from sustain level
Gain is used to set overall gain and vel is used to set the change according to the velocity of note played.
the frq knob is used for cutoff, i.e, removing of unwanted frequencies. res knob is used to set the resonance, sat is used to set the saturation. trk adjusts how much the cutoff frequency changes according to the note number played.
You can choose from one of 5 filter modes. LP Stands for Low Pass, HP Stands for High Pass, BP stands for Band Pass.
The parameters are pretty straight forward, beat is used to set tempo of arps, gate sets the length of each note, type is used to set the type of arpeggiator. ON button is used to turn it off or on.
Equalizer is used to EQ,Pan is used for panning.Tempo Delay is a delay effect. It also contains a Chorus/Flanger effect.
Synth1 Official manual - http://www.geocities.jp/daichi1969/synmanu/readmeeng.html#ope2

1) Oscillator section
Synth1 contains 2 oscillators containing basic waveforms. It also contains a sub osc containing 4 basic waveforms.Oscillator section is where our sound originates. The sound is shaped be many parameters which is gonna be covered in other sections aswell.
Osc 1: Osc 1 contains 4 basic waveforms - Sine wave, Saw wave, Triangle and a square wave/pulse. It also contains a detune knob to detune the sound aswell as a FM Knob which'll Frequency modulate the sound of osc1 from osc 2. FM is used in making metallic sounds which are helpful to make modern dubstep synth patches.
Osc 2: Osc 2 also contains 4 waveforms but instead of a sine waveform there is a noise oscillator. Ring button is used for ring modulation and sync is used to sync the frequency of both oscillators.Track button pitches the output according to the note number played. When turned off, sound is output at a uniform frequency. Pitch is used to adjust pitch of osc2 and Fine is used for minor changes in pitch.
Modulation Envelope:
An envelope is basically used to shape the sound. Modulation envelope shapes the modulation. A knob is used to set Attack, D knob is used to set Decay and amt is for amount to be applied. This envelope can be applied to any one of the three destinations that is FM, osc2 and pulse width.
Coming to the Oscillator mixer,
Key shows that current key at which the oscillator is playing. Shift buttons can be used to shift the key to any number of semitones.(-12 means 1 octave low and +12 means 1 octave high). Mix is used to mix the sound of oscillators. Left side of the knob is going to be osc1 and right is for osc 2. P/W is used to manipulate pulse width.Phase is used to adjust the phase and tune is used for minor adjustments in pitch
2) LFO Section:
LFO Stands for Low Frequency Oscillator. LFO modulates a source periodically (Oscillates).LFO is another main player when it comes to creating Dubstep sounds.There are 2 LFOs in synth1.Both of them work in the same way. You can chose from six LFO waveforms by clicking on the wave displayed in LCD. This LFO can be applied to seven different destinations as shown in the figure above. Spd corresponds to speed of LFO and amt corresponds to amount of LFO to be applied. Pretty straight forward. Tempo button syncs to the tempo of your track why key button syncs to the key at which you are playing.3) Amplitude Envelope
Amp Envelope is used to shape the volume of your sound.A stands for Attack and is used to shape the time taken for your sound to hit its peak.
D stands for Decay and is used to shape the time taken for your sound to reduce from the attack level to sustain level
S stands for Sustain and is used to shape the level during the time the key is held.
R stands for Release and is used to shape the time take for the level to reach zero from sustain level
Gain is used to set overall gain and vel is used to set the change according to the velocity of note played.
4) Filter Section
It contains an ADSR section which acts on filter instead of volume.the frq knob is used for cutoff, i.e, removing of unwanted frequencies. res knob is used to set the resonance, sat is used to set the saturation. trk adjusts how much the cutoff frequency changes according to the note number played.
You can choose from one of 5 filter modes. LP Stands for Low Pass, HP Stands for High Pass, BP stands for Band Pass.
5) Arpeggiator
Used to create arps. Arpeggiators plays nodes of a chord automatically in a sequence with fixed tempo.The parameters are pretty straight forward, beat is used to set tempo of arps, gate sets the length of each note, type is used to set the type of arpeggiator. ON button is used to turn it off or on.
6) Effects
The first section "Effect" has many effects, Analog distortion,Phaser,Digital distortion,Ring Mod, Decimator etc.Equalizer is used to EQ,Pan is used for panning.Tempo Delay is a delay effect. It also contains a Chorus/Flanger effect.
7) Voices
It contains parameters to make your sound monophonic (Only one note can be played at once), Polyphonic (More than one note can be played at once),legato, portamento(glide effect),Unison.8) Settings section
Contains master volume knob, Preset manager, and settings(opt).9) Resources
Synth1 Detailed manual - https://sound.eti.pg.gda.pl/student/eim/doc/Synth1.pdfSynth1 Official manual - http://www.geocities.jp/daichi1969/synmanu/readmeeng.html#ope2

